Making Yogurt in the Instant Pot
 |
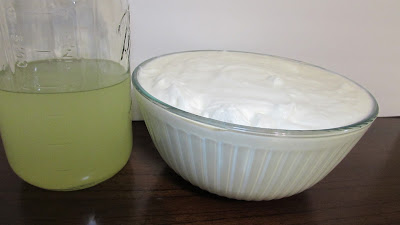
| Homemade yogurt and whey, made in the Instant Pot |
One of the functions of the Instant Pot is the yogurt function (not included in LUX version). This function makes the whole yogurt making process simpler, and gives you some options as well.
Why You Want to Make Yogurt Yourself:
-You can customize your tartness and thickness
-It's cheaper than store made (you only have to buy yogurt the first time, you can continue to make more off the previous batch)
-You know the ingredients (milk and yogurt)
-Great probiotics, it is packed in protein
-Whey (the liquid left over from straining the yogurt) can be useful
-You can use in place of sour cream (especially tarter and thicker versions)
What is Needed:
-Whole Milk (half a gallon up to 1 gallon)
-Instant Pot to incubate heat the milk and to keep your to-be yogurt at ideal temperature
-Instant read thermometer to ensure milk has cooled prior to adding starter culture
-Cheesecloth or Nut Milk Bag to strain whey from yogurt (some people skip this step)
-Yogurt Starter (active culture plain yogurt or some use freeze dried starter)
-Set up to strain yogurt, if you choose (Large bowl, colander, and cheesecloth/nut milk bag. Or yogurt strainer)
-Hot pan grippers of choice (such as hot pan tongs or silicone mini mitts)
Making Yogurt in The Instant Pot
Making yogurt at home allows you to create yogurt that matches your desired thickness and tartness amount. You can change the incubation time to create a thicker and more tart yogurt. You can strain the yogurt a little or a lot (or not at all), depending on your desired thickness. Each step of the process does take some time, the result is worth the wait.Step One:
Pour milk into inner pot of Instant Pot. Insert inner pot into cooker portion of Instant Pot. Close/lock lid, or use a tempered glass lid. Currently your display screen should read OFF.
Step Two:
Press Yogurt button, then Adjust button. The word Boil will start blinking on your display. After a few seconds, the machine will start beep (3 times) confirming the program, and Boil is on display (no longer blinking). Once the program is finished running, it will beep (10 times) and the display will now say Yogt on the screen.
Press Warm/Cancel button twice to cancel program (display should now say OFF), and remove inner pot (make sure you protect your hands with hot pan tongs or silicone mini mitts, it is hot). Allow heated milk to cool until 110F, using an instant read thermometer to check this. I stir the milk with the thermometer probe as I'm checking. Once milk cools to 110F, add 3 or more tablespoons of active culture plain yogurt (or follow freeze dried starter directions), whisking in completely.
Step Four:
Return inner pot to cooker. So before we go further, you have to decide how long you want to incubate for. Default time is 8 hours of incubation, which is a milder version of the yogurt. The longer you let it incubate, the more tart and thick it will be (the longer the yogurt cultures have to do their work).
-If you want the default time (8 hours): Press Yogurt button, 8:00 should appear on the screen. Wait until you hear the confirmation beeps (3 beeps), the display will change to 0:00 and start counting up to set time. Do not stir during incubation.
-If you want to alter the incubation time: Press Yogurt button, 8:00 should appear on the screen, then press + button to increase time or - to decrease time, until desired time is reached. Leave desired time on screen, until you hear the confirmation beeps (3 beeps), the display will change to 0:00 and start counting up to set time. Do not stir during incubation. It's fine to taste it to determine if desired tartness has been reached.
 |
| Yogurt after incubation, before cooling |
Step Five:
Once Yogurt program is finished running for programmed amount of time, it will beep several times and the machine the display will say Yogt. Press Cancel/Warm button twice to turn off device programs. Move inner pot out of cooker and into refrigerator. Allow to sit in refrigerator for a couple hours.
Step Six:
Set up your yogurt straining equipment. Typically I use 2 layers of cheesecloth lining colander, set in large bowl. The nut milk bag worked well, but not as convenient for me (pour or spoon chilled yogurt into nut milk bag, over a large bowl). If you hanging bag on something, no need for colander. Otherwise, set bag in colander. Alternately, you can use a yogurt straining device. Allow to strain for 2-4 hours. Check straining mixture about every hour, pouring whey off as needed (you can save this for other uses), until it reaches desired consistency.
The pictures below are an example of 2 hours of straining, which yielded 10 cups of yogurt and just under 4 cups of whey. If I were to have strained the yogurt longer, I could have probably got another 1/2 cup to 1 cup more of whey out of it.
Step Seven:
Transfer to storage bowl or container. If you plan to make more yogurt in the future, I recommend that you set aside a small container with at least 4 tablespoons of yogurt to use as your starter next time.
You can use this yogurt as greek style yogurt (flavoring to taste), as sour cream, in baked goods, to make frozen fruit and yogurt pops, in a cheesecake-like recipe (I promise to post about that soon) or use in smoothies.
Let's Talk Whey:
The whey resulting from this can be useful. It still has a lot of protein in and probiotics in it. You can use it in replace of citrus juice in smoothies, you can use it as buttermilk in baked goods, you can dilute it and water many plants that like acidic soil (berries, tomatoes, peppers, etc.), to marinade meat, or to cook beans/pasta (cooking will loose probiotic qualities). There are many more ways, but these are the uses I have tried myself.
Once Yogurt program is finished running for programmed amount of time, it will beep several times and the machine the display will say Yogt. Press Cancel/Warm button twice to turn off device programs. Move inner pot out of cooker and into refrigerator. Allow to sit in refrigerator for a couple hours.
Step Six:
Set up your yogurt straining equipment. Typically I use 2 layers of cheesecloth lining colander, set in large bowl. The nut milk bag worked well, but not as convenient for me (pour or spoon chilled yogurt into nut milk bag, over a large bowl). If you hanging bag on something, no need for colander. Otherwise, set bag in colander. Alternately, you can use a yogurt straining device. Allow to strain for 2-4 hours. Check straining mixture about every hour, pouring whey off as needed (you can save this for other uses), until it reaches desired consistency.
The pictures below are an example of 2 hours of straining, which yielded 10 cups of yogurt and just under 4 cups of whey. If I were to have strained the yogurt longer, I could have probably got another 1/2 cup to 1 cup more of whey out of it.
Step Seven:
Transfer to storage bowl or container. If you plan to make more yogurt in the future, I recommend that you set aside a small container with at least 4 tablespoons of yogurt to use as your starter next time.
You can use this yogurt as greek style yogurt (flavoring to taste), as sour cream, in baked goods, to make frozen fruit and yogurt pops, in a cheesecake-like recipe (I promise to post about that soon) or use in smoothies.
The whey resulting from this can be useful. It still has a lot of protein in and probiotics in it. You can use it in replace of citrus juice in smoothies, you can use it as buttermilk in baked goods, you can dilute it and water many plants that like acidic soil (berries, tomatoes, peppers, etc.), to marinade meat, or to cook beans/pasta (cooking will loose probiotic qualities). There are many more ways, but these are the uses I have tried myself.


